Data Objects Editor Overview
Data Objects Editor Overview
Article summary
Did you find this summary helpful?
Thank you for your feedback
Assette Developer Center (Last updated on 22nd May 2024)

Login to Assette using your Client Code and login credentials. The Application will authenticate the user and enable access to permitted modules based on the logged user role.

If the user has access privileges to the Developer Center, the respective Tile will be visible on the landing page.

Accessing Data Objects
Login to Assette application using Client Code and login credentials. Once the user is authenticated at the login process, the user will be shown the centers and features that the user is permitted to access on Assette (Input Center, Authoring Center, Output Center, Workbox, Workflow, Admin Center, Content Center, Developer Center, Tenant Manager).
Upon navigation to the Developer Center, based on permitted user roles such as Data Object Viewer, Data Object Developer and Data Object Admin will be able to access Data Object Editor. 
Data Object Editor
Create New Data Objects - Overview

By selecting
 button, user will be navigated to a pop window where user is asked to select the Output Type which user wishes to create Data Object.
Once user selects the Output Type of the Data Object, user will get navigated to the Data Object Editor overlay. At the Top Left-hand corner, the Display Name, Object Type and Category will be displayed. This info would be editable within the General Info screen. Object Editor overlay consists of 3 main areas(tabs) which are, Design View, YAML View & Preview.
If Object type = ‘Table’ all the Design View options would apply. But for Image, Text and Value types, selected options will apply. See below.
Advance View | Table | Image | Values | Text |
General info | x | x | x | x |
Data Source | x | x | x | x |
Input Settings | x | x | x | x |
Columns | x | |||
Grouping | x | |||
Sorting | x | |||
Summary | x | |||
Row types | x | |||
Title and Footnotes | x | |||
Legend | x | |||
Output Variable | x | |||
No Data Message | x | x |
Create New Data Objects – Table
 When the ‘Table’ option is selected in the Output Type selection pop-up window, users will be directed to the Data Object Editor overlay. Within this interface, users will have access to various configuration options, including General Info, Data Source, Data Settings, Columns, Grouping, Sorting, Summary, Row Types, Title & Footnotes, Legend, Output Variables, Internal Variables, and No Data Message.”
General Info: In this section the user is provided the ability to select Display Name, Name, Category (Dropdown), Usage (Dropdown), Description, User for (Table, Chart, Both).
Display Name: This field is mandatory, and users can provide a unique Display Name for the Data Object they are creating. The Display Name is not editable, but users can enter it in their preferred format (e.g Client_Holdings, Client Holdings). The Display Name you provide will be reflected on the reports generated using this Data Object.
Name: This field is mandatory, and users can provide a unique name for the Data Object. Data Object name is editable and should not have spaces/special characters as this is used as an internal usage ID. (e.g. ClientHoldings).
Category: This field is mandatory. Users are required to designate the appropriate category for the new Data Object they are in the process of establishing.
Usage: The user is not required to execute any actions in this section. The usage option is set to ‘Library’ and will be automatically selected as the default for the user.
Description: Users are encouraged to provide a comprehensive description of the data object. This description should elucidate the object’s purpose and any pertinent information related to it. This will facilitate a better understanding of the data object’s function and relevance.
Use For: In this setting, users are presented with three distinct options: Table, Chart, Both. The selection of these options will determine the utilization of the data object. Depending on the user’s choice, the data object can be applied to a Table, a Chart or both. This allows for flexibility and customization based on the user’s specific requirements.
Data Source: Within the Design View section, users are granted the capability to manage and configure Data Sources. They are furnished with settings such as ‘Retrieve Data From’ and ‘Data Block Name’ (presented as a dropdown menu). Additionally, users are endowed with the functionality to create new Data Blocks, modify existing ones, and refresh metadata source values. This suite of features facilitates a comprehensive and flexible approach to data management.
Retrieve Data From: Users have the option to select the source from which data is retrieved via a provided dropdown menu. At present, Data Blocks serve as the primary source for Data Objects and are selected by default. This eliminates the need for users to manually select any values from the dropdown, thereby streamlining the user experience.
Data Block Name: All Data Blocks, which have been created within the Assette application, are readily available for user selection. This feature facilitates seamless navigation and efficient utilization of the application’s resources.
Create New Data Block
 : By clicking this button, users will be directed to the Data Block Editor. Where, they have the opportunity to create a new Data Block.
Edit an existing Data Block
 : By clicking this button, users will be directed to the section where all existing Data Blocks are displayed. They have the ability to select and edit an existing Data Block prior to designating it as the source for the Data Object.
Refresh metadata source values
 : By clicking this button, users have the capability to restore the metadata of the originating Data Block. This implies that any modifications made to the metadata can be seamlessly updated and reflected in the source Data Block.
Data Settings: In this segment, users are endowed with the functionality to administer and configure the Data Settings for the Data Object, in addition to appending Dynamic Fields to it. Any Data Setting incorporated into the Data Object will be exhibited on the grid, characterized by columns such as Data Setting Name, Display Name, Data Type, Display at, Default Value, and Usage.
 : By clicking this button, users will be directed to the Data Block Editor. Where, they have the opportunity to create a new Data Block.
 : By clicking this button, users will be directed to the section where all existing Data Blocks are displayed. They have the ability to select and edit an existing Data Block prior to designating it as the source for the Data Object.
 : By clicking this button, users have the capability to restore the metadata of the originating Data Block. This implies that any modifications made to the metadata can be seamlessly updated and reflected in the source Data Block.
ADD DATA SETTINGS
 : Upon selection of this feature, the user will be directed to the Data Setting Creation interface. Here, they have the opportunity to construct Data Settings for the Data Object they have created. The user is granted the flexibility to incorporate as many data settings as they deem necessary. The interface provides a variety of settings including Data Settings Name (which is mandatory), Data Type (presented as a dropdown menu), Display Name, Labels, Source Parameter (checkbox option), Constant Value (checkbox option), Description (text field), Help Text (text field), Display at (dropdown menu), and Control Type (dropdown menu). This comprehensive suite of options ensures a high degree of customization and control over the data settings of the Data Object.
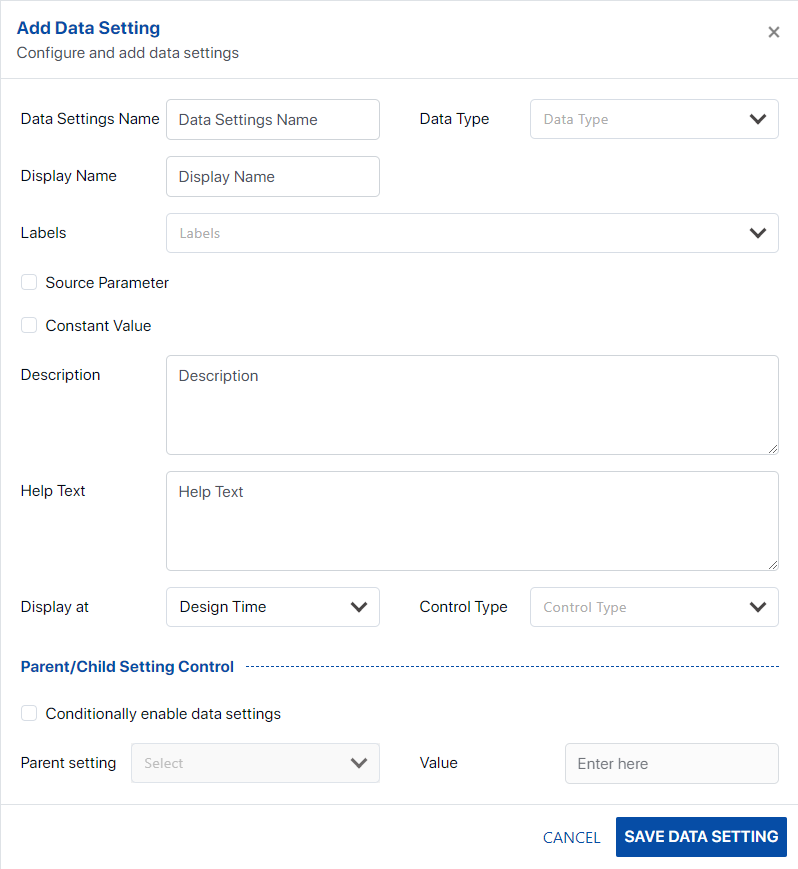
Data Setting Name: This field is mandatory, and it requires the user to input the designated name for the Data Setting. This ensures a unique identifier for each Data Setting inside the Assette application.
Display Name: This is the designated area where the user can input the Display Name for the Data Setting. This name will be prominently displayed on the fabrication panel specifically for this Data Setting, providing a clear and identifiable reference point.
Data Type: From this dropdown, users can select the ‘Data Type’ for the Data Setting they are creating. Options include ‘Text’, ‘Integer Number’, ‘Decimal Number’, ‘Date’, and ‘Yes/No’. The selection will update the ‘Default Value’ segment at the end of the ‘Add Data Setting’ window, allowing users to input a default value corresponding to the chosen ‘Data Type’.
Labels: In this field, users have the ability to input a series of labels that serve to identify the specific Data Setting they are incorporating into the Data Object. This functionality allows for efficient categorization and retrieval of data within the system.
Source Parameter: Upon activating this checkbox, a new dropdown setting, ‘Source Field Name’, will be prompted, enabling users to select the appropriate Source Field Name from the available options.
Constant Value: Upon selecting this checkbox, users are enabled to establish a Data Setting with a fixed value. Consequently, only the ‘Description’ and ‘Help Text’ fields remain accessible, while ‘Display at’, ‘Control Type’, and ‘Parent/Child Setting Control’ are removed from the ‘Add Data Setting’ window.
Display at: From this dropdown, users can determine the phase at which the Data Setting becomes effective, either during the Design phase (Design Time) or the report generation phase (Generation Time).
Parent/Child Setting Control: This section of the Data Setting creation panel will only get activated upon the selection of Conditionally enabled data settings option. User can select Parent Setting (Dropdown), Value (Text Field).
Key Value Source: This segment of the Data Setting creation interface becomes operational only when the ‘Conditionally enable data settings’ option is selected. Users can then choose the ‘Parent Setting’ from a dropdown menu and input a ‘Value’ in the text field.

Generation Time Parameters (Last updated on 22nd May 2024)
When you’re adding Data Settings in a report, you have two types of parameters you can choose from: Generation Time Parameters and Design Time Parameters.
Generation Time Parameters are parameters that are used when the report is being run or generated. For example, parameters like “As of Date” or “Account Code” would be used at the time the report is being generated to provide real-time, up-to-date information. These parameters are common across Data Objects and need to be pre-defined via Dynamic Fields. Please note that the names of these Generation Time Parameters are “reserved” and cannot be changed.
.png "image (6).png")
On the other hand, Design Time Parameters are parameters that are defined during the authoring or design phase of the report. Examples of these could be “Sector scheme” or “Include cash in output”. These parameters may come from available settings or Dynamic Fields.
Both types of parameters are defined at the data block level. However, additional parameters can also be defined at the Data Object level.
In summary, the choice between Generation Time and Design Time parameters depends on when you want the parameter to be applied - during the generation of the report or during the design phase. This gives you flexibility and control over how your report is configured and what information it presents.
Please refer to Dynamic Fields on how to define Generation Time Parameters.
Dynamic Fields (Last updated on 30th April 2024)
Dynamic fields are like data settings, except that the scope is much broader. Data settings are applied to a given data object, whereas dynamic fields would be commonly applicable to multiple data objects.
There are several dynamic fields that are defined in the Assette Application. For example, As of date and Account Code are used as a runtime parameters. These are fixed parameters that are used at report generation time by the generation overlay. With dynamic fields, it will be possible to add a new runtime parameters.
A new runtime parameter can be defined (for example, country) and added by clicking on  as shown below.


Dynamic Field Name should be used to denote how the input appears in the data source.
Data Type can be one of the following.

Date: can be used for date type data setting (e.g., as of date is 2023-04-30)
Decimal: can be used for the number type data setting which are not whole numbers. (e.g., unit cost is 1.00)
Integer: can be used for the number type data setting which are whole numbers. (e.g., number of records is 5)
Text: can be used for any string type data setting (e.g., sector scheme is GICS)
Display Name can be used to denote how it would be visible to the end user.
Labels Currently, the system has a predefined set of labels for a data setting e.g., PII(Personally Identifiable Information):True, Format:Currency, TimePeriod:True.
Description can be used to provide detail about the dynamic field.
Help Text can be added to explain the functionality of the dynamic field for the end user.
Base Field can be added to ensure a common term is used across the Application. This is necessary in the rare occasions where a dynamic field which uses the same input values is denoted with different Dynamic Field Names. For example, currency code can be defined in many ways - currency, currency code or money type- depending on how it is denoted in the data source.
If the user selects ‘visible’ in generation overlay, the selected dynamic field will appear in the generation overlay as a runtime parameter. If unchecked, the user will see it as a design time parameter for the selected shell in the Assette editor fabrication panel. An example where currency and purpose is used as a runtime parameter is shown below.

If a data setting is defined as a design time parameter, then value for that parameter needs only be defined at the initial design of the smart page. If a data setting is defined as a run time parameter, the user must provide the value for that parameter each time a report is generated,
Control Type The user can either select a constant value or a predefined value list, identical to the behaviour of a data setting definition in object design. There are 2 control types. One is like the data type of the data setting which can be used to allow users to enter constant value e.g. sector scheme is GICS. The other control type is “Select”. This allows the user to select one option from a dropdown.


Under Fixed Values, the user can define the list of values to be displayed in the single select drop down list. e.g., show cash can be either Yes or No option. The user must add both options.
It is also possible to define a value list for a selected data block using key value source. Users can select any columns of the table output type data block for the key columns and value column. Key column and value column are related to the single selection dropdown list. Key column is used to identify each value of the drop down uniquely. Value column is used to add the values which needs to displayed in the dropdown e.g., in show cash data setting key column “yes” mapped to value column “Yes”. Key column “no” mapped to value column “No”.

The user can add values under the Ignore keys which can be skipped in the list. When a block is added here that block is getting executed internally and shows its response which is a list of values as the list values of this data setting. If the user does not want to show some values in that list, such values can be added to Ignore keys text box. For example, if a user adds a block to return some currency types and wants to restrict showing some of the currency types.
A default value can be specified for the dynamic field.
The user can navigate to the preview tab and preview how the defined dynamic field would be visible to the user in the generation overlay.

Adding a Dynamic Field to a Data Object
Once a dynamic field has been added, it is possible to select this as a runtime parameter under data settings when creating or editing a data object. Data objects can have both design time and runtime parameters and both types are displayed in the data setting list. Design time parameter values can be selected at design time. Dynamic field value can be selected only at generation/execution time of the report.
 will open a pop up which can be used for selecting the required field(s). The pop-up window supports a search facility. In addition, the dynamic field list in the pop-up window can be sorted by Name, Display Name, Data Type and Control Type.
The user is provided with a preview option which is similar to the dynamic field preview.

Dynamic Field Design View

Importantly, if a dynamic field is added to the object design it is editable by the user. The only editable field is “Display At”. which is related to the nature of a data setting i.e., runtime parameter or design time parameter.
Condition Editors (Last updated on 8th May 2024)
Condition Editors allow you to specify conditions for data objects. These allow the user to create dynamic conditions and define actions based on these conditions, which are applied using a formula or text-based expressions.
Types of Conditions:
Formula  : An expression that involve data setting and columns.
Text Expression  : It’s a way to define text-based content dynamically. To populate labels, descriptions, or any text -based elements with dynamic content.
Defining conditions using a formula
When formulas are supported the  icon will appear and clicking on
the  button will bring up the window shown below.

The user can construct the formula by picking the relevant variables from the list. The variables need to be associated with the operators listed below.
The following categories of operators are available for the user to select from. Selecting each category will display the list of operators available to formulate the query.
.png "image(275).png")
Clicking on the link  will direct the user to the Assette support site. Alternatively, please refer <https://support.assette.com/docs/object-editor-expressions > for the list of expressions supported by the Object Editor for text expressions and formulae.
Below is an example of a formula constructed via the  Editor.
A formula can be added using metadata (columns, data settings, internal or output variables).
If the user wants to add a new column using the value returned by the formula COSTBASIS/QUANTITY.
Select the variables from the available list to construct the formula as shown below.

By clicking on
 the icon, the user can add the formula as a dynamic value and save the column.
 the icon, the user can add the formula as a dynamic value and save the column.
Add/Edit conditions in text
A user will be able to add text conditions by clicking on the ![]() icon. The window shown below will open.
icon. The window shown below will open.

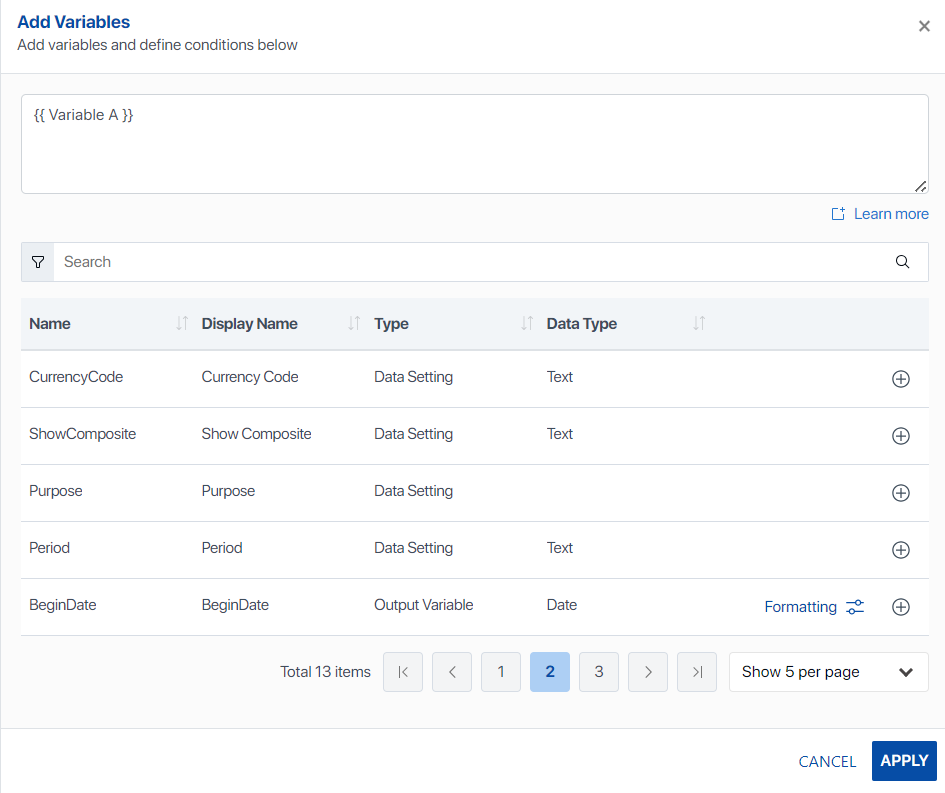
The user will be able to pick the required variable(s) for constructing the text expression. When adding variables in text, user doesn’t manually type the {{ }} brackets. Instead, select the desired variables from a list by clicking 
The system will apply the necessary {{ }} formatting automatically. As such, when the user chooses a variable, it will be correctly enclosed within the placeholders.

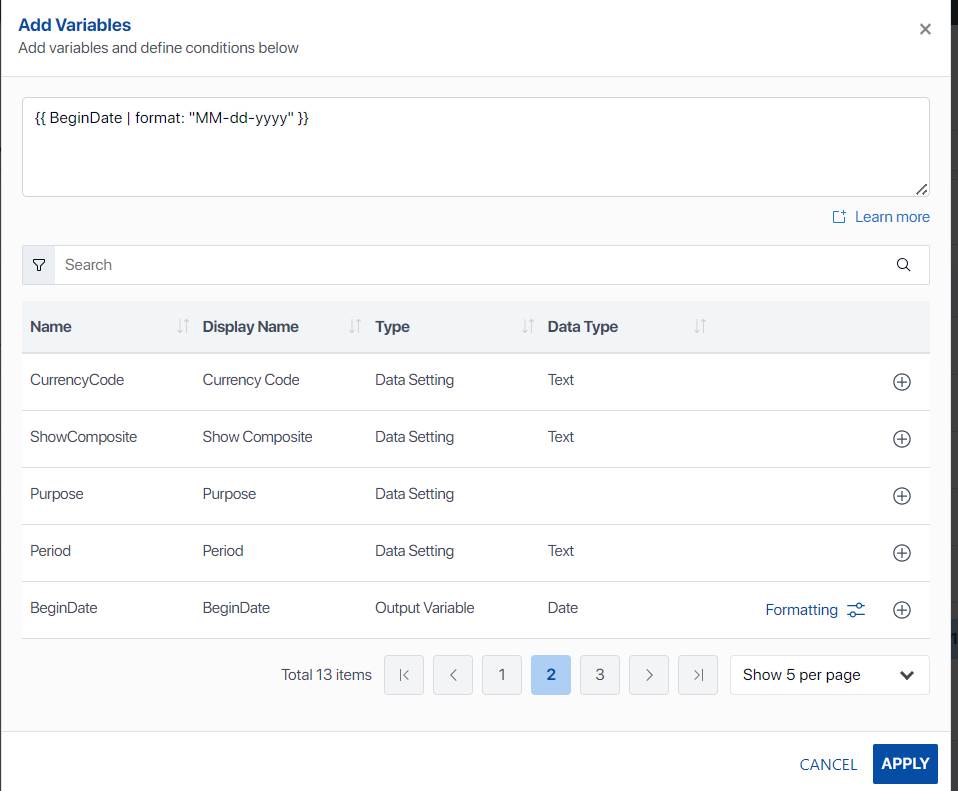
For example, in the 'Change in Portfolio' object below, the activity text in the first row needs to have the begin date of the period appended to it. This can be handled using a text expression with the begin date output variable.

If the Activity column value equals "Begin Value," then the formatted Begin Date needs to be appended with the text 'Begin Value.'
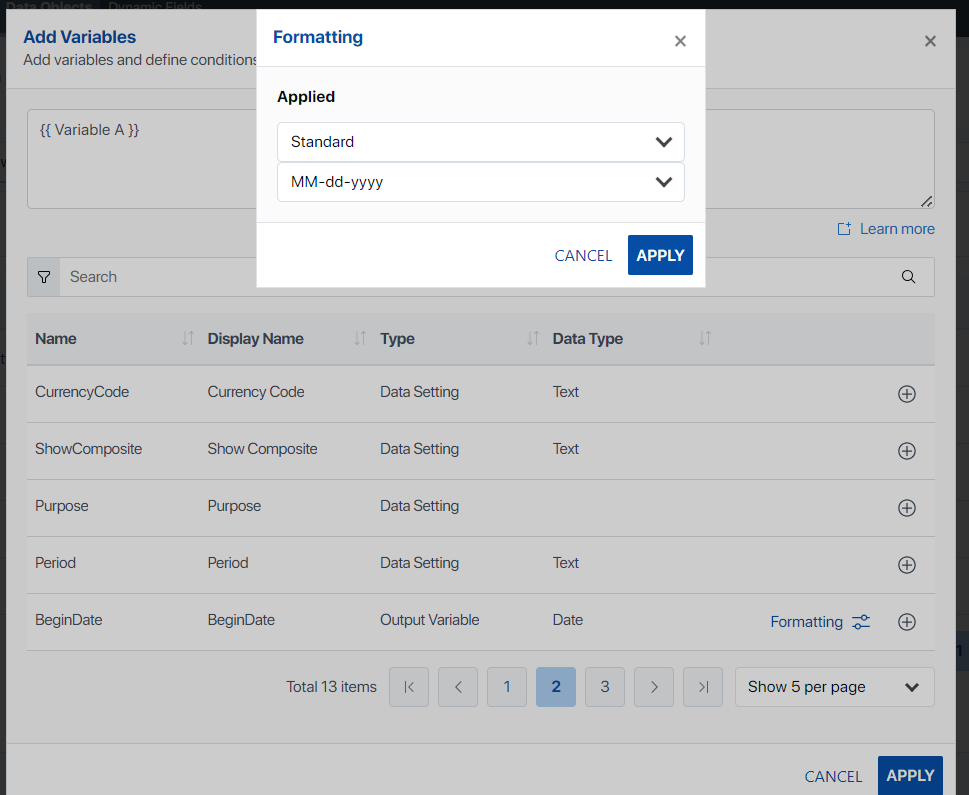
The user can construct the text expression above to format the display text of 'Begin Date' or 'End Date' as 'Begin Value dd/mm/yyyy' and 'Ending Value dd/mm/yyyy'.

The date formatting is done as follows:
Select the date field to be formatted and click on “Formatting”.


Add the formatted field using the + symbol. The formatted field will appear as shown below.

Data Settings (Last updated on 31st May 2024)
In this segment, users are endowed with the functionality to administer and configure the Data Settings for the Data Object, in addition to appending Dynamic Fields to it. Any Data Setting incorporated into the Data Object will be exhibited on the grid, characterized by columns such as Data Setting Name, Display Name, Data Type, Display at, Default Value, and Usage.
.png "image(276).png")
ADD DATA SETTINGS
 : Upon selection of this feature, the user will be directed to the Data Setting Creation interface. Here, they have the opportunity to construct Data Settings for the Data Object they have created. The user is granted the flexibility to incorporate as many data settings as they deem necessary. The interface provides a variety of settings including Data Settings Name (which is mandatory), Data Type (presented as a dropdown menu), Display Name, Labels, Source Parameter (checkbox option), Constant Value (checkbox option), Description (text field), Help Text (text field), Display at (dropdown menu), and Control Type (dropdown menu). This comprehensive suite of options ensures a high degree of customization and control over the data settings of the Data Object.
 : Upon selection of this feature, the user will be directed to the Data Setting Creation interface. Here, they have the opportunity to construct Data Settings for the Data Object they have created. The user is granted the flexibility to incorporate as many data settings as they deem necessary. The interface provides a variety of settings including Data Settings Name (which is mandatory), Data Type (presented as a dropdown menu), Display Name, Labels, Source Parameter (checkbox option), Constant Value (checkbox option), Description (text field), Help Text (text field), Display at (dropdown menu), and Control Type (dropdown menu). This comprehensive suite of options ensures a high degree of customization and control over the data settings of the Data Object.
Data Setting Name: This field is mandatory, and it requires the user to input the designated name for the Data Setting. This ensures a unique identifier for each Data Setting inside the Assette application.
Display Name: This is the designated area where the user can input the Display Name for the Data Setting. This name will be prominently displayed on the fabrication panel specifically for this Data Setting, providing a clear and identifiable reference point.
Data Type: From this dropdown, users can select the ‘Data Type’ for the Data Setting they are creating. Options include ‘Text’, ‘Integer Number’, ‘Decimal Number’, ‘Date’, and ‘Yes/No’. The selection will update the ‘Default Value’ segment at the end of the ‘Add Data Setting’ window, allowing users to input a default value corresponding to the chosen ‘Data Type’.
Labels: In this field, users have the ability to input a series of labels that serve to identify the specific Data Setting they are incorporating into the Data Object. This functionality allows for efficient categorization and retrieval of data within the system.
Source Parameter: Upon activating this checkbox, a new dropdown setting, ‘Source Field Name’, will be prompted, enabling users to select the appropriate Source Field Name from the available options.
Constant Value: Upon selecting this checkbox, users are enabled to establish a Data Setting with a fixed value. Consequently, only the ‘Description’ and ‘Help Text’ fields remain accessible, while ‘Display at’, ‘Control Type’, and ‘Parent/Child Setting Control’ are removed from the ‘Add Data Setting’ window.
Display at: From this dropdown, users can determine the phase at which the Data Setting becomes effective, either during the Design phase (Design Time) or the report generation phase (Generation Time).
Control Type: Control Type depends on the Data Type of the Data Setting that user is creating for the Data Object. For an instance if the Data Type is selected as Text, then the Control Type will be selected as Text by default. Apart from the Data Type, 2 other options will be provided at the Control Type dropdown which are Select and Multiselect. If either of the Select or Multiselect options were chosen, Fixed Values & key Value Source sections will appear.
Parent/Child Setting Control: This section of the Data Setting creation panel will only get activated upon the selection of Conditionally enabled data settings option. User can select Parent Setting (Dropdown), Value (Text Field).
Key Value Source: This segment of the Data Setting creation interface becomes operational only when the ‘Conditionally enable data settings’ option is selected. Users can then choose the ‘Parent Setting’ from a dropdown menu and input a ‘Value’ in the text field.

Columns
In the event that the Data Object type is designated as ‘Table’, the values retrieved from the data source (for instance, a Data Block) will be automatically recognized and incorporated as existing columns, as illustrated below.

Adding a new column: By selecting
 button, Upon selection, the user will be directed to an interface designed for the addition of columns to the Data Object currently under creation. This ‘Add Column’ interface is divided into two primary sections: ‘Settings’ and ‘Values’.

Within the ‘Settings’ section, the user is required to input the following information:
Column Name (Text field): Within this text field, users are tasked with specifying the Column Name for the Data Object under creation. This designated name will serve as an internal identifier for the column within the Assette Application.
Labels (Dropdown): In this dropdown field, users have the ability to input a series of labels that serve to identify the specific Dynamic Field. This functionality allows for efficient categorization and retrieval of data within the system.
Display Name (Text field): Users have the ability to designate a ‘Display Name’ for the column. This name will be prominently displayed within the Assette Editor when the Data Object is employed for reporting functions.
Placeholder (Text Field): The ‘Placeholder Text’ field is designed to convey the requisite placeholder format to be employed during the authoring process. For instance, the placeholder for ‘Market Value’ might be represented as <nnnnnnnn,nn>.
Column Header Name – Type (Dropdown): The ‘Column Header Name’ can be configured utilizing either static or dynamic text, providing flexibility in presentation.The ‘Column Settings’ feature permits the input of both static and dynamic text. This functionality empowers users to insert conditions as needed, thereby enabling the customization of the Column Header format to suit specific requirements.
Column Header Name - Insert Conditions (Applicable only for Dynamic Text): When the user selects the Column Header name as “Dynamic Text”, an interface will be presented with a text field for entering the Dynamic Text value. This interface also includes functionality for defining conditions. The user has the flexibility to determine the type of conditions they wish to apply to the Data Object’s column. These conditions adhere to a nested methodology, for example, “If – else – else if - then”. The user has the capability to add an unlimited number of conditions for the specified column header name, providing a high degree of customization. This feature enhances the user’s ability to manipulate and manage data effectively.


Column Header Name – ‘Add Variables’: In addition to defining conditions, users have the ability to incorporate Variables into the Condition. When an ‘if’ condition is present, users can select the Function (Fx) option. Moreover, users have the flexibility to incorporate Variables into the ‘then/else’ condition using the Text (Tx) option, which allows for dynamic text in the output condition. This feature further enhances the user’s ability to create complex and tailored conditions, providing a high degree of customization and control over the data manipulation process. The conditions support a variety of operators, including:
Mathematical Operators: Addition (+), Subtraction (-), Multiplication (*), Division (/), Modulus (Mod(n1,n2)), Absolute Value (Abs(n1,n2)), Rounding (Round(n)), and Power (Power(n1,n2)).
Logical Operators: Equals (=), Less Than (<), Greater Than (>), Less Than or Equal To (<=), Greater Than or Equal To (>=), Not Equals (<>), AND (and), OR (or), NOT (not).
Special Keywords: null, undefined, true, false.
Conditional Operators: HasValue(v1), ValOrDef(v1, defaultValue).
Date Related Operators: Date(year, month, day), ToDate(dateAsString), Year(date), Month(date), Day(date), DayOfWeek(date), Quarter(date), AddToDate(date, years: nyears, months: nmonths, days: ndays).
String Processing Operators: StartsWith(mainString, subString), StartsWith(mainString, subString, ignoreCase: true), EndsWith(mainString, subString), EndsWith(mainString, subString, ignoreCase: true), Contains(mainString, subString), Contains(mainString, subString, ignoreCase: true), IsEmpty(st), Number(st), Trim(st), Upper(st), Lower(st), SubString(st, start: nchars, end: nchars),

Other Settings - ‘Drop if not available in Data Source’ (Checkbox) – Upon selecting this checkbox, the user will have the ability to remove a column that has been added to the Data Object. This action can be performed if no data is available or has been passed to the Data Object through the Data Block. This feature provides users with greater control over their data management process, ensuring that only relevant and necessary data is included in the Data Object.
Description (Text field): Users are encouraged to provide a comprehensive description of the Column. This description should elucidate the Column’s purpose and any pertinent information related to it. This will facilitate a better understanding of the Column’s function and relevance.
Within the ‘Value’ section, the user is required to input the following information:
Output Type (Dropdown): The dropdown menu allows users to select values for the column of the Data Object. The available output types include Source Value, Static Value, Dynamic Value, and Dynamic Text.
Source Value: When selected as the output type, the Data Type dropdown will be disabled. A Value Column dropdown will appear, allowing the user to select the Source Value from the provided options.
Static Value: If chosen as the output type, the user can select the Data Type from the provided dropdown options. These include Text, Integer Number, Decimal Number, Date, Yes/No, Currency, and HTML. Based on the selected Data Type, a Static Value column will appear where the user can input the Static Value.
Dynamic Value: When selected as the output type, the user can choose the Data Type and provide Dynamic Value formulas. They can also insert conditions as needed.
Dynamic Text: If chosen as the output type, the user can select Text as the Data Type and provide the Dynamic Text in the provided column.
This functionality provides users with a flexible and dynamic way to interact with the Data Object. It allows for a variety of Output Types and Data Types, catering to a wide range of user needs and preferences. Please ensure to select the appropriate Output Type and Data Type based on your specific requirement.
Within the ‘Cell Styles’ section, users have the ability to select a Default Class from a provided dropdown menu. These classes are predefined and readily available for selection from the Default Class dropdown menu. Furthermore, users also have the flexibility to add conditions for the Cell Styles, providing a more customized and dynamic user experience. This feature enhances the adaptability of the interface, allowing users to tailor the Cell Styles according to their specific needs and preferences. Please ensure to select the appropriate Default Class and conditions based on your specific requirements.
.png "image(279).png")
Grouping
The interface provides the capability to organize data sets at various levels. Users are presented with the flexibility to select both the ‘Group By’ and ‘Sort By’ columns as depicted in the subsequent screen. Furthermore, users are granted the ability to group data by multiple field names, offering a versatile and comprehensive data analysis experience.

Group By: Based on the levels that the user decides to achieve when grouping, each level has Group By dropdown option for user to select the group by order in a particular level. User is provided the dropdown options based on the Data Object.
Sort By: Based on the levels that the user decides to achieve when grouping, each level has Sort By dropdown option for user to select the sort order in a particular level. User is provided the dropdown options based on the Data Object.
Expression: Moreover, user is provided the ability to add expressions (Conditions) while grouping via Expression section by simply selecting Insert Condition option.
Add Header Row: The title of the Header Row is designed to support either static or dynamic output, contingent upon the user’s selection. There exists the capability to incorporate conditions that format the title of the Header Row.
Moreover, the Header Row can be mapped to a pre-existing column. This feature enables the definition of summary values within the Header Row by incorporating columns that are supported by aggregate functions. As per necessity, an option to delete is readily available.

Add Summary Row: The functionality of the Summary Row is designed to mirror that of the Header Row.
There will be options available to conceal or reveal child rows, contingent upon a specified condition.
Please note that Assette Editors are equipped to support the filtering and rounding of data as detailed below.
Filtering is facilitated at various levels within the Data Engine. It will be feasible to filter data through Transformation Data Blocks, conditions in Data Objects, or specific settings in the Fabrication panel. Regarding rounding logic: When aggregating a column, the user has the option to either round the data rows first and then sum, or sum first and then round. Both these methodologies are currently supported.

Show child rows / Hide child rows / Hide child rows If: With these 3 radio button options at the bottom of the Grouping section, user can simply select whether they want the child rows of the Data Object to be shown or hidden. Also user can add condition by selecting the Hide child rows if option.
Sorting
Within this section of the Data Object Editor, users are granted the capability to organize their data based on selected columns. This feature provides a dynamic and user-friendly way to manage and view data, enhancing the overall user experience. The sorting functionality is not limited to a single level. It supports multi-level sorting, allowing users to sort data based on multiple columns simultaneously. This multi-level sorting feature offers users more granular control over how their data is organized, making it easier to analyze and interpret complex datasets. Users can customize their data view to suit their specific needs and preferences, making the tab a versatile and essential component of the user interface. Please ensure to utilize the sorting functionality effectively to optimize your data analysis and interpretation process.

Sort By (Dropdown): By using this dropdown menu, users can select the specific component they wish to sort. This feature provides a user-friendly interface that enhances data management and allows for a more personalized and efficient user experience. Please ensure to select the appropriate component based on your specific sorting requirements.
Data Setting Name (Text Field): In the event that multiple components are selected within a single level, a ‘Data Setting Name’ dropdown menu will become available. This allows users to specify which Data Setting name should be prioritized for sorting within that level. This feature enhances the flexibility and customization of the sorting process, catering to a wide range of user needs.
Expression: Furthermore, users are also provided with the capability to insert conditions in this section. This adds an additional layer of customization, enabling users to define specific criteria for the sorting process. This functionality ensures a more personalized and efficient user experience, allowing users to manage and view their data in a manner that best suits their specific requirements. Please ensure to select the appropriate Data Setting name and conditions based on your specific sorting needs.

Summary
This is where user can define the Summary of the Data Object that they are currently creating. This section of the Data Object Editor has 2 parts as Summary Row Title and Summary Values In Summary Row.

Summary Row Title – Output Type (Dropdown): The Summary Row Title is designed to support both static and dynamic outputs, depending on the user’s selection. If user select the Static Text option, then they can type the Static Summary Text in the given text box. If Dynamic Text is selected as the Output Type, user can enter the Dynamic Text value in the provided text box and also can insert Conditions and variables as well.
Summary Row Title – Column to Map the Summary Row Title (Dropdown): Via this option the Summary Row can be mapped to an existing column, providing a seamless integration with current data structures.
Summary Values In Summary Row: In this section, users are granted the ability to define summary values in the Summary Row. This can be achieved by incorporating available columns, which can be selected via the Columns dropdown menu. These columns are supported by aggregate functions, accessible via the Aggregate Type dropdown menu. For added convenience, a delete option is also provided. This ensures users maintain full control over their data and its presentation.

Row Type
Within this tab the user can define row types based on conditions or value mappings.
Conditional row types It is possible to add/delete conditions based on math/text/logical operations to map rows.

Similarly, rows can be mapped based on values.
Select the column from the list to which the value needs to be mapped. Then add/delete the new value mappings as shown below.

Style Classes (Last updated on 12th June 2024)
This feature allows users to define and manage Color Style Classes at various levels - table, row, cell, or text for the Data Object. This means users can create unique color styles and apply them to different elements within their Data Object for a more customized and visually appealing presentation.
One of the key functionalities of this feature is the ability to apply pre-defined color styles. Users can select from a range of pre-set color styles and apply them directly to a table, a specific type of row, a column, or any text style where text is used. This offers users the flexibility to quickly style their content without having to manually set the color each time.
Another powerful aspect of the “Style Classes” feature is the ability to conditionally override color style definitions at the column, row, or cell level. This means that even if a certain color style has been applied to a table or row, users have the option to override this style for a specific column, row, or cell. This provides users with a high level of granularity and control over the look and feel of their content.
 In summary, the “Style Classes” feature is a versatile tool that empowers users to create visually engaging and personalized content in the Object Editor. It offers a balance of predefined styles for ease of use, and customizable options for those desiring more control over their content’s appearance.
Creating a new Style Class (Table): Initiate the process by selecting the
 button.
Choose the Object: Prior to selecting the ADD NEW button, user should verify whether the Style Class that they are about to create is in which Object Type. By default, Text option is selected, and user can select Cell, Row or Table.
Name: Provide a unique and identifiable name for the Style Class. This is a mandatory step.
Description: You have the option to add a description for the Style Class. This step is optional but recommended for better understanding and future reference.
Configure the Style Class Settings: The settings for Table Style Classes, Cell Style Classes, and Row Style Classes are similar, with the exception of Text Style Classes, which have a slightly different set of options and user interface.
Choose the Available Configurations: Cell Style Class, Row Style Class, and Table Style Class have three sectors of Available Configurations: Font, Background, and Borders. Text Style Class, on the other hand, only has Font configurations.
Apply the Settings: Select your preferred Font, Background, and Border settings. Remember to apply each selected setting as they will only be applied if each setting is turned on via the radio button provided on the left side of each configuration.
Preview the Settings: During the Style Class configuration process, a quick preview of the selected settings will be displayed on the right side of the UI.
Save or Cancel: As the final step, select the add button to save the Style Class. If you wish to discard the changes, simply select Cancel. You will be asked to confirm whether you want to discard the progress of the Style Class that is under process.
Please note that the name provided in step 4 is the name of the Style Class, not the Data Object’s name. I hope this guide helps you in creating a Style Class for a Data Object. If you have any more questions or need further clarification, feel free to ask.

Footnotes (Last updated on 22nd April 2024)
Footnotes are stored in a central Library by the Assette application. Footnotes can be added by a user with Qualitative Data Author, Qualitative Data Owner, Data Object Developer and Data Object Admin roles.
Navigate to the Footnotes Tab and click on Create new to add a new footnote as shown below.


The user can enter Name, Add footnote and Output Type (static text, dynamic text or disclosure).
Add footnote supports 4 options: always, If, If any of the rows and if all the rows.

The option Always allows the footnote to be displayed unconditionally. However, the other options allow footnotes to be added conditionally.

The  button will allow the user to define the condition(s) under which the footnote will be displayed. It will be possible to add a Suffix to any of the fields picked dynamically with a given format. (Refer example below).
The Output Type can either be static, dynamic or disclosure type. If the user selects static text, it will be possible to add a static footnote as shown below.

Selecting dynamic text will allow the user to add conditions and associate variables into the footnote as shown below.
Example: Display dynamic footnote if performance history table displays data for inception to date. In this scenario, the Data Block should be implemented in such as a way to populate an output variable to indicate ITD period availability (“ITDAvailable”).
Add the required Variable(s) in footnote section to get the relevant meta data.

Add the required columns to which a suffix needs to be added.

Define a dynamic footnote as below.

In case multiple footnotes from the Library need to be merged it is possible to add separators and terminators.

A footnote can be added as a single paragraph, bulleted list, numbered list or merged with Above which allows combining the footnote with another item added prior. The separators will determine which characters can be added when merging footnotes and which characters can be used to terminate a footnote as shown below.

Once saved and published the footnote will be available in the footnote Library. Footnotes can be edited by a user assigned with Data Object Developer, Data Object Admin and Qualitative Data Owner roles.
Footnotes that are created can be added to a Data Object from the Library as shown below. (Note: Only a Data Object Admin will be able to delete an existing footnote).
Associating a Footnote to a Data Object
From the Data Object Editor select the relevant Data Object and navigate to the Title and Footnote Tab on the side panel. Clicking  in the Footnote area will link to the footnotes Library.

A user can search for available footnotes within the Library using the Search option.
Optionally, the  option allows the user a define a footnote directly from the Object Editor.

The added footnotes will appear under the Data Object as shown below.

Rich Text Support
HTML styling can be applied to footnotes by turning on the HTML Styling toggle switch on. The user will have options to Bold, Underline, Italic text, apply superscripts or subscripts and select font colors.

Synchronizing Footnotes
When a footnote in the central Library gets updated, the synchronization function ensures that these changes are propagated to all the Data Objects that are referencing it.
Footnotes can be updated by a Data Object Developer, Data Object Admin, Qualitative Data Owner and Qualitative Data Author. The Save and Publish action will make the footnote changes exposed to Data Objects as shown below.

Once the changes are made, clicking on Publish will synchronize the changes to the Data Objects which are already using the given footnote.
The user would be prompted by the following message.
The footnote Performance Types Gross has been successfully updated. The following Data Objects referencing the footnote will be automatically updated. Data Object <name 1> Data Object <name 2> Data Object <name 3> |
If the user Cancels, it will abort the action. Proceeding with changes will complete the operation.
Data Objects with updated footnotes will be turned into draft state and need to be re-published for the footnote changes to take effect. (Note: Data Objects that are already published with previous versions of the footnotes will not be affected).
Legend
It will be possible to define legends based on title/colors that appear on Charts.
Output Variables
Output variables may get defined in a Data Block and passed on to a Data Object for additional processing.

Edit/delete of variables will be allowed.
Add variable It will be possible to define settings and values against a given output variable as follows.

Values can be set for different output/data types specified below. Conditions can be applied for each.

Below is an example for Output type ‘Dynamic value’. Similarly, other types will prompt predefined formats.

For dynamic value, a user can specify data type and the desired dynamic value using a formula that will support basic math operations. I will be able to apply conditions as relevant.
Internal Variables can be defined at Data Object level to be used for additional processing. (e.g. when defining conditions). Note that these are created and used within the scope of the Data Object only.
Displaying No data message
Navigate to the ‘No Data Message’ tab in the Object Editor Design view. The user can add an appropriate message when no data is returned from a Data Block.

Navigate to the Data Object Preview. Where no is returned, the specified ‘No data message’ will be displayed in Object Editor Preview.

Navigate to Assette PowerPoint editor. If the selected Data Object does not return any data in the response, the following message will be displayed when previewed.
.png "image(272).png")
Preview Data Object
Preview is used to bind data to the created Data Object for purpose of validation by a developer. It will load up the following navigation and default Data Settings screen. (For Object Type Table).

Data Settings will display generation and run time parameters to select from.
Columns will allow to select columns from the available list.

Display Settings : will help to select the settings needed to apply for selected columns as shown.

Results - can be shown as formatted response, raw response, output variables and raw requests.
Save Once the Data Object Properties have been defined ‘Save’ will update the changes into the current version and keep the Data Object in draft stat.
Publish Publishing a Data Object will make it available in the Data Object Library.
Force unlock When a Data Object is being edited it will obtain a lock under the current user. Should the Data Object be locked for an extended period of time, the Force unlock feature can be used (by a higher authority user like Data Object Admin) to release the lock for editing by the new user.
Condition Editors
It is possible to add conditions in the form of a Formula (Fx) or Text based expressions (Tx) to a Data Object via Condition Editors.
Defining Conditions using a Formula
Where Formulas are supported the Fx icon will appear and clicking on the Fx button will bring up this window.

The user can construct the formula by picking the relevant variables from the list. The variables need to be associated with the operators listed above.
The following categories of operators are available for the user to select from.
General
Mathematical
Logical
Special Keywords
Conditional
Date Related
String Processing
Selecting each category will display the list of operators available to formulate the query.
Clicking on the ‘Learn more’ link will direct the user to the Assette support site. Optionally, Please refer <https://support.assette.com/docs/object-editor-expressions > for the list of expressions supported by the Object Editor for Text expressions and formulae.
Below is an example of a formula constructed via the Fx Editor.
A formula can be added using metadata (columns, data settings, internal or output variables).
If a user wants to add a new column using the value returned by the formula COSTBASIS/QUANTITY,
Select the variables from the available list to construct the formula as follows.

Add the formula as a dynamic value and save the column.


Add/Edit conditions in Text
A user will be able to add text conditions by clicking on the Tx icon. The following window will open.

The user will be able to pick the required variable(s) for constructing the text expression.
The list of string operators available can be selected from the available functions shown.
Note: the user will be able to format numeric/date fields using the “Formatting” option.

The user can construct the above text expression to format the ‘Begin Date’ or ‘End Date’ depending on Activity type.
Note: the Date Formatting is done as follows’.
Select the Date Field to be formatted and Click on “Formatting”.
Pick the desired date format from standard or custom options available.
Add the formatted field using the + symbol. The formatted field will appear as follows in the editor.


