Data Blocks Editor Overview
Data Blocks Editor Overview
Article summary
Did you find this summary helpful?
Thank you for your feedback
Data Blocks Editor Overview (Last updated on 15thMay 2024)
The Data Blocks Editor serves as a sophisticated platform for the effective management and manipulation of your Data Blocks.
Accessing Data Block Editor
Access to Assette is granted through the use of a Client Code and corresponding login credentials. Upon successful authentication, the user is presented with the center and features to which they have been granted access within Assette. Depending on the Developer Center user roles assigned, access to Data Block features may be restricted. Please refer to Developer Tools User Roles and Permissions. The Developer Center consists of 4 main areas.
Data Blocks
Data Objects
Dynamic Fields
Footnotes

Data Block Editor
Create New Data Blocks
By selecting ![]() button, user will be navigated to the Data Block Creation Overlay. Creation Overlay consists of below mentioned areas,
button, user will be navigated to the Data Block Creation Overlay. Creation Overlay consists of below mentioned areas,
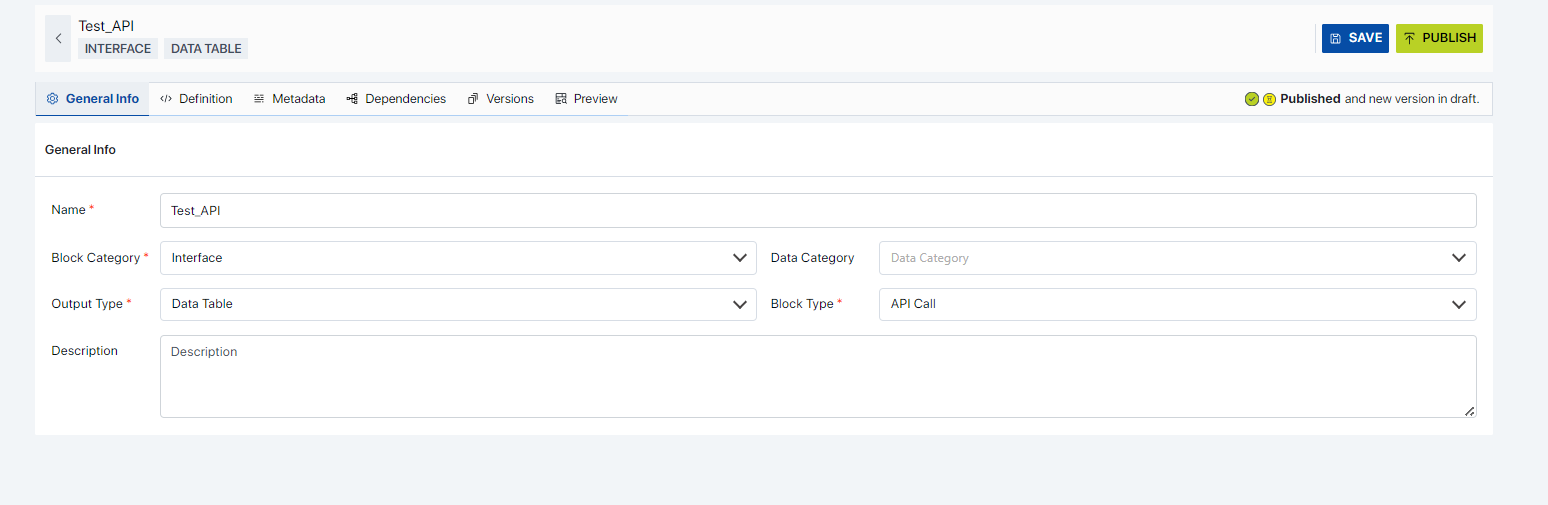
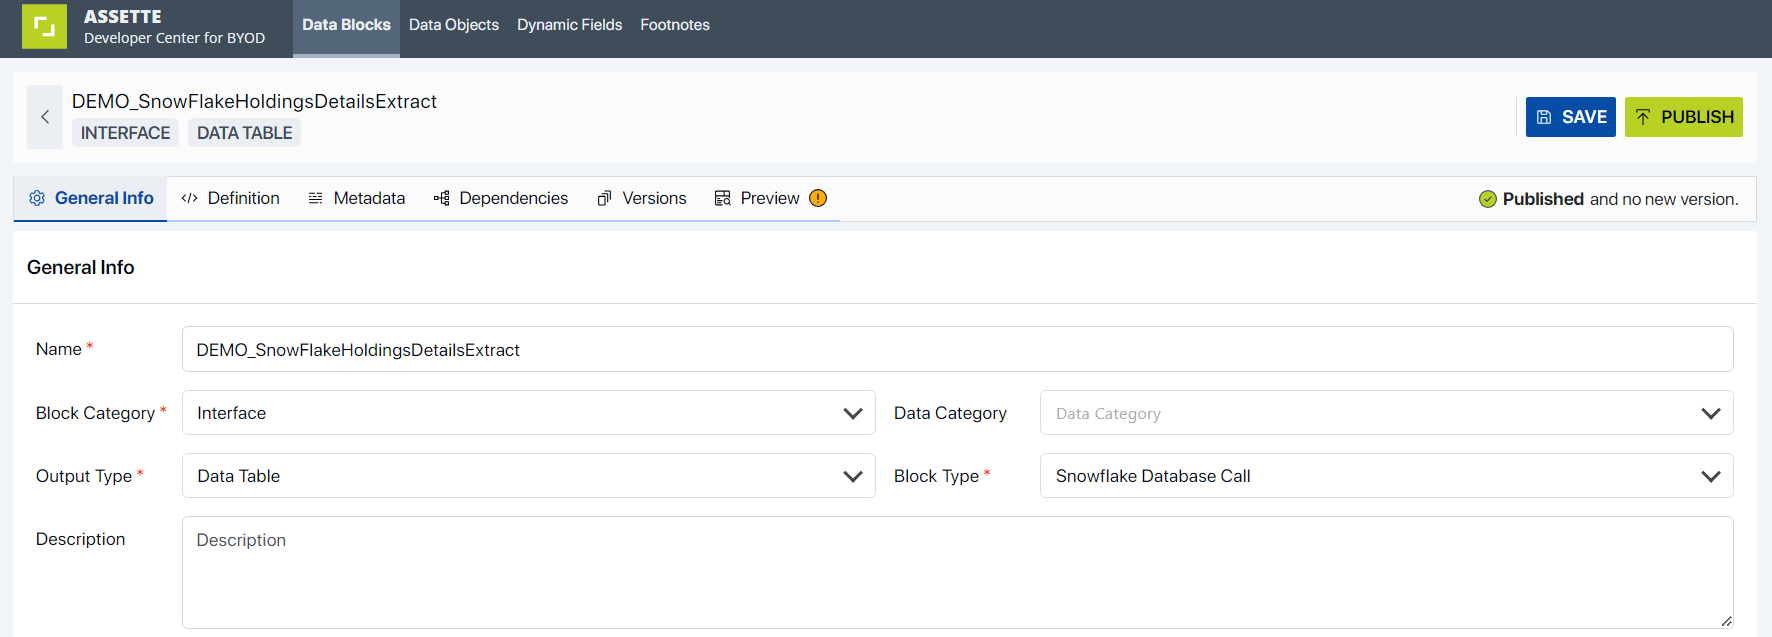
General Info
This section consists of Name (Mandatory Field, default name is given at the beginning which is editable for the user at any point), Block Category (Mandatory Field), Data Category, Output Type (Mandatory Field), Block Type (Mandatory Field), Description.

Name | This is a mandatory field for the user to provide the preferred name for the Data Block. By default, a name will be provided by Assette. (Ex: NewDataBlock<integer>) |
Block Category | This is a mandatory field where user has to select the Block Category from the dropdown menu. Configuration, Decoration, Interface, Transform are the four types of Block categories user could create the Data Block for. |
Block Category | This is a mandatory field where user has to select the Block Category from the dropdown menu. Configuration, Decoration, Interface, Transform are the 4 types of Block categories user could create the Data Block for. |
Data Category | This is not a mandatory data field. Users could define which Data Category the Data Block will fall under by simply selecting the Category from the provided dropdown. Data Categories are, Accounts, Asset Allocation, Characteristics, Cover, Data Loading, Dates, Gains Losses, Holdings, People, Performance, Portfolio Activity, Sector Allocation, Special Section, Transaction. |
Output Type | This is a mandatory field where user can select the Output Type of the Data Block via the provided dropdown menu. Output Types are, Binary, Custom Python Library, Data Table, None, Settings, Text, Values. |
Block Type | This is a mandatory data field where user can define the Data Block Type via the provided dropdown. Available Block Types are, API Call, Azure Blob, Caching, Client Python Library, Constant, Language Fragment, Local Database, Local Kusto Database Call, Mapping, Mongo Database Call, Open AI, Permission Filter, Python, Python Environment, Settings, Snowflake Database Call, SQL Server Database Call, Template, Text Settings, Through. Please refer to Data Block Types for more comprehensive examples. |
Description | This field is not mandatory. However, users are encouraged to provide a detailed description of the Data Block they are creating, as it allows for a more comprehensive understanding of its purpose and functionality. |
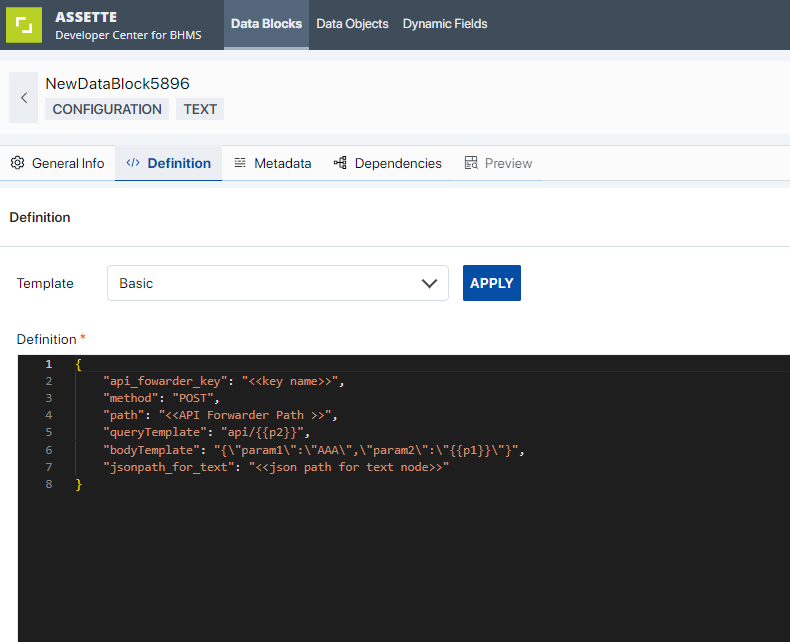
Based on the selected Block Type, relevant block type’s templates will get loaded. Users can select the template from the Template dropdown and select Apply button for the template to get loaded over in the prompt.

Upon selecting a particular ‘Block Type’, the corresponding template will appear in the ‘Definition Editor’. This provides developers with the flexibility to refine the code to align with their specific needs.


Metadata

“The Metadata Editor is a tool that outlines the structure of the impending Data Object.”. Developers have the capability to define the Columns, Request Parameters, and Output Variables that will be accessible to Data Objects. In this context, Request Parameters equate to the Data Settings for the Data Object. The Columns translate to Data Object Columns, and Output Variables can be utilized for supplementary processing.
Columns | The ‘Columns’ section comprises two tabs: ‘Settings’ and ‘Validations’. The ‘Settings’ tab allows users to augment the metadata of the Data Block with additional columns. Users can input the ‘Name’ and ‘Display Name’ in the provided text fields, select the ‘Data Type’ from a dropdown menu, choose ‘Labels’ from another dropdown, and provide a ‘Description’ in the final text field.  | |
Columns > Settings | Name | This field, which requires a user-provided column name, is mandatory. The designated name will be utilized within the Assette application. |
Display Name | This is a mandatory field where users can assign a ‘Display Name’ for the column. This designated name will be utilized as the column name in the generated report. | |
Data Type | In this dropdown, users can select the ‘Data Type’ for the column they are adding. Available data types include ‘Text’, ‘Integer Number’, ‘Decimal Number’, ‘Yes/No’, ‘Date’, ‘HTML’, and ‘Currency’. | |
Labels | In this field, users have the ability to input a series of labels that serve to identify the specific Column Settings they are incorporating into the Data Block. This functionality allows for efficient categorization and retrieval of data within the system. | |
Description | Users are encouraged to provide a comprehensive description for the column that is being created. | |
Columns > Validations |
The user has the ability to choose one or both of the two validation options simultaneously. To elucidate, consider the following example: The metadata of a Data Block, specifically ‘ISSUERNAME’, has been marked with the validation option “Must not be null”. If this column happens to contain null values, upon executing a Preview for this Data Block, the user will be presented with a message stating, “The following column(s), which are designated as ‘must not be null’ in the metadata, have been detected with null values in the response: ISSUERNAME.”  If a user chooses the “Column must be included in output” option for the “TICKER” column, they should get a message during the preview stage. This message will tell them that the “TICKER” column is not showing up in the output. This helps to make sure the output data is correct and complete.   | |
Request Parameters | ‘Request Parameters’ adhere to the same options provided for ‘Columns’. Users can incorporate parameters into the metadata of the Data Block they are creating. Additionally, users can provide a Default Value for the parameters they are intended to pass on for the Data Block. For a comprehensive understanding of the available settings, please refer to the ‘Column’ section’s available options. | |
Output Variables | ‘Output Variables’ adhere to the same options provided for ‘Columns’. Users can incorporate Output Variables into the metadata of the Data Block they are creating. For a comprehensive understanding of the available settings, please refer to the ‘Column’ section’s available options. | |
 Under this section, users have the ability to incorporate validations for the column being created. Currently, two validation options are supported, presented as checkboxes: ‘Column must be included in output’, and ‘Must not be null’.
Dependencies
The creation of a new Data Block allows for the addition of dependent Data Blocks. It’s important to note that a functional Data Block may necessitate a sequence of interdependent Data Blocks to derive the final output. Dependencies can be added by selecting  button.
Upon clicking the ‘ADD DEPENDENCY’ button, users will be presented with a window. Here, they can select a ‘Dependency Block’ from a dropdown menu and assign a ‘Dependency Name’ as per their preference.
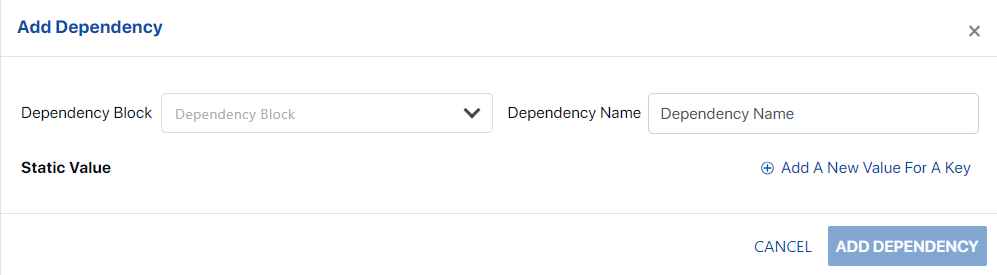
Moreover, the user has the capability to add static values for the dependencies using
 button. Any incorporated ‘Static Values’ can be conveniently removed using the ‘Delete’ icon.

 button. Any incorporated ‘Static Values’ can be conveniently removed using the ‘Delete’ icon.
Preview
Upon configuring the Data Block, users have the ability to evaluate its functionality through the ‘Preview’ option. Initially, users must input the Request Parameters on the left side of the Data Block Editor, corresponding to the created Data Block.
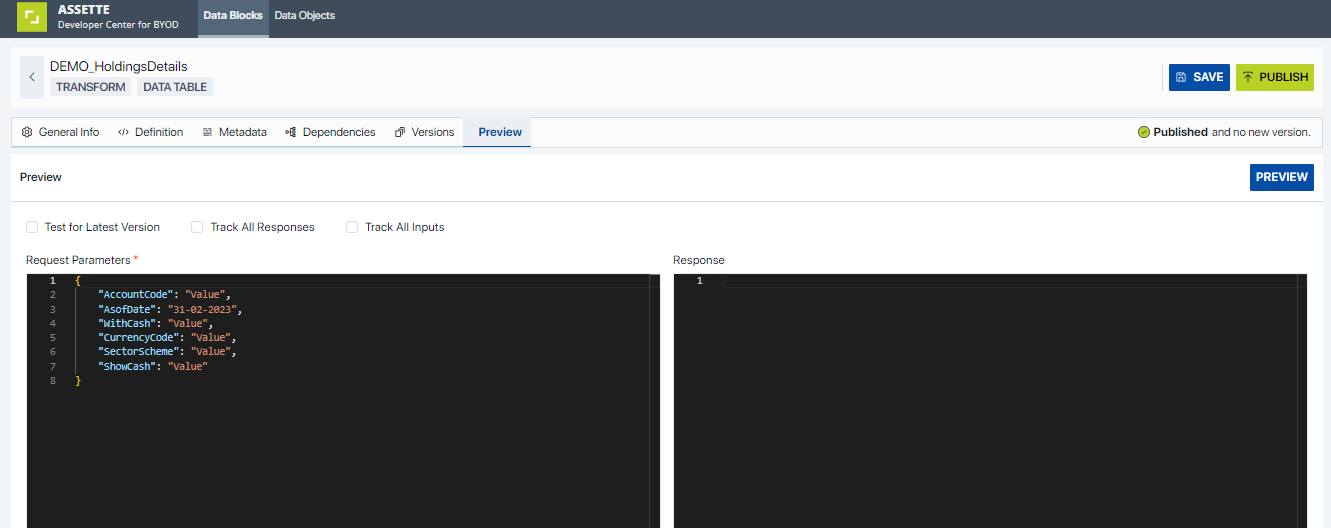
Input parameters are automatically populated in accordance with the Metadata definition. Upon clicking ‘Preview’, the Test block will be executed, and the resulting output will be displayed in the ‘Response’ text area. Opting for ‘Track All Responses’ or ‘Track All Inputs’ will relay any debug information incorporated within the Data Block code.
Furthermore, upon previewing the constructed Data Block, the user will be presented with a comprehensive validation report. This allows the user to promptly identify and rectify any issues, ensuring the integrity and accuracy of the Data Block. Each validation point serves as a guide, enabling the user to take appropriate corrective actions.

Edit

If user wants to modify a created Data Block, users can initiate the editing process by selecting the pencil icon corresponding to the desired Data Block item. This action will navigate the user to the ‘Edit Block’ screen, where the block details are pre-populated. Users can then execute the necessary edits and save the block.
Publish the Data Blocks

When users are assured that the Data Block is prepared for publication, they can proceed by selecting one or more items from the ‘View Blocks’ screen and clicking the ‘Publish’ button. Upon publication, the respective Data Block(s) will be marked with a ‘Published’ icon under the status column.
Delete Data Blocks
In the event that a Data Block becomes redundant, it can be removed by selecting the Delete option provided at the hamburger menu of the Data Blocks displayed. Please note that the ‘Delete’ action performs a ‘soft delete’, and this operation can only be executed by a user with the ‘Data Block Admin’ role. For further details, please refer to ‘User Roles and Permissions’.
Copy Data Blocks
In the event that a duplicate of an existing Data Block is required, users can create a copy by selecting the ‘Copy’ option from the hamburger menu of that particular Data Block. Please note that this action will generate a new Data Block with the prefix ‘[Copy of]’ added to the original block name. Users are then required to rename the block as necessary. The content of the copied block will mirror that of the original block.
Import and Export Data Blocks
The “Import/Export Block” feature enables the transfer of an existing Data Block to or from a different tenant, subject to user permissions.

Clicking on the “Import” button opens a dialog box, allowing users to select the required file from a Network location.
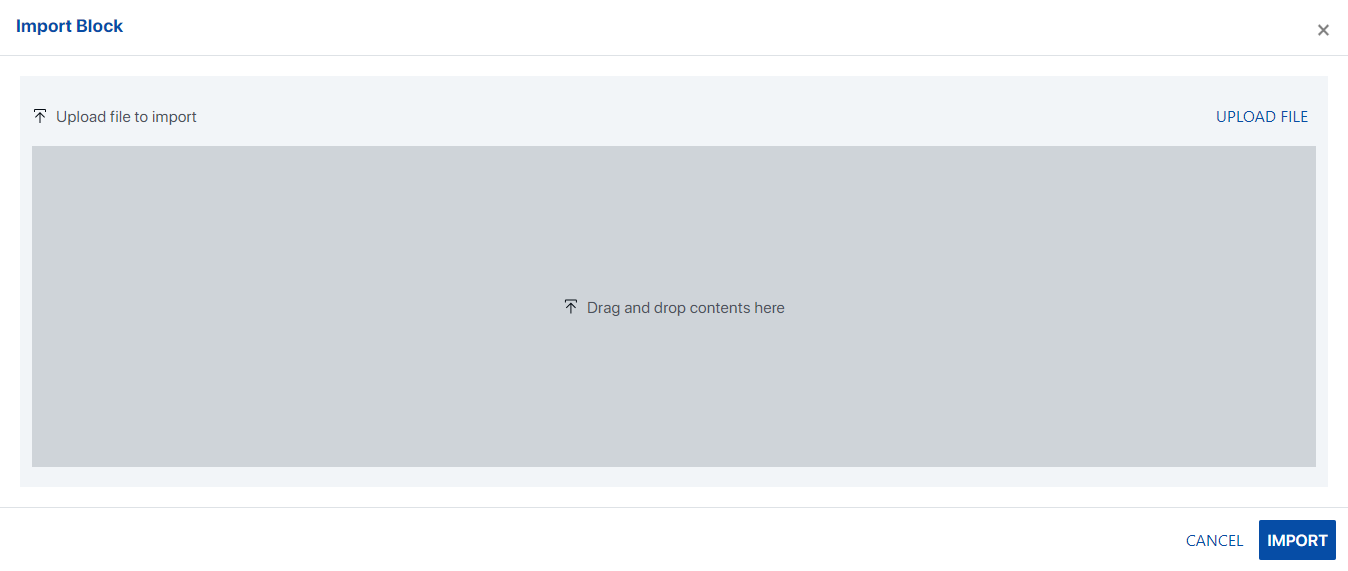
The chosen file can then be imported into the current tenant.
Users will be prompted to select the block and any required dependencies.
A visual representation of the blocks/dependencies affected by this action will be displayed.
Details of the user and the import transaction need to be recorded in the database table.
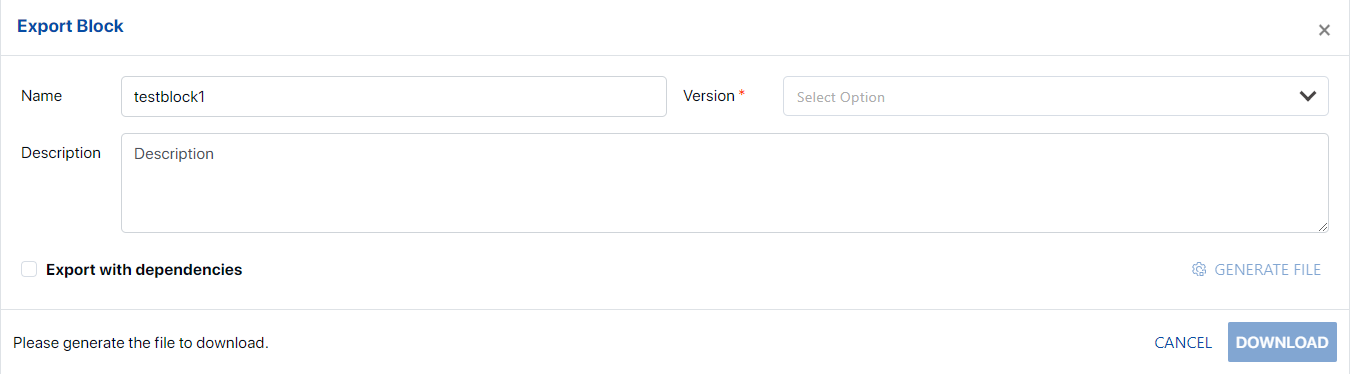
Additionally, a new hamburger menu item, “Export,” will be available under the View Block screen/Data Block item level.
Clicking on “Export” opens the Data Block View screen, enabling users to select the Data Block to be exported.
Users can select the block to be exported along with any required dependencies. (Note: Only published Data Blocks can be exported).
Details of the user and the export transaction need to be recorded in the database table.
The selected Data Block and dependencies will be saved into a file in the chosen network location.


Search
User can perform searching functionalities for all criteria (Name, Output Type, Block Type, Category, Last Modified By, Status). This is a ‘like’ search and Advanced Searching mechanism is provided to perform more specific searching provided with 6 Data Types (Category, Output Type, Block Type, Last Modified By, Status, Show).

Data Block Types
Currently the Data Block Editor supports API Call, Azure Blob, Caching, Client Python Library, Constant, Content Service Read, CSV Reader, Language Fragment, Local Database, Mapping, Mongo Database Call, Open AI, Permission Filter, Python, Python Environment, Setting, Snowflake Database Call, SQL Server Alchemy Database Call, SQL Server Database Call, Template, Text Setting, Through, XL Reader. Below are few comprehensive examples for the
API Call: Below are the steps to use the API Call Block Type for data interfacing.
Create a data block with Category as “Interface”, Block Type as “API Call” and the Output Type as provided from the source. For this example, the “Data Table” Output Type is selected.
The provided templates can be opened to see the required parameters. There are 3 sample templates as shown below.
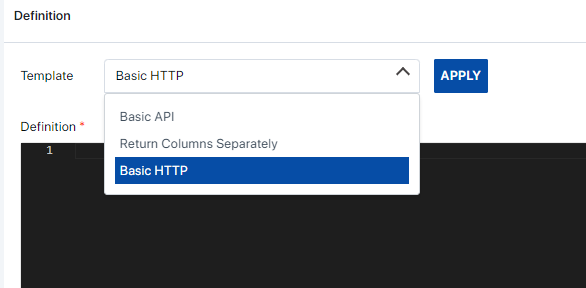
Basic HTTP: The Basic HTTP template type can be selected for basic HTTP calls. Ideally access to these API endpoints should be public for the Assette Application to access the endpoints. The following template is the general structure required.
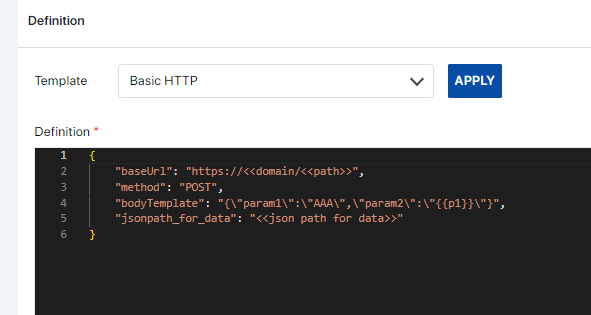
For example, if a public API endpoint is used, the structure maybe as follows.
baseUrl: This represents the base URL of the API you're interacting with. It consists of two placeholders <<domain>> and <<path>> which are expected to be replaced with the actual domain and path of the API endpoint respectively. For example, if the domain is "api.example.com" and the path is "/endpoint", the resulting URL would be "https://api.example.com/endpoint".
method: Specifies the HTTP method to be used when making requests to the API. In this case, it's set to "POST", indicating that the data will be sent to the server in the request body.
bodyTemplate: This represents a template for the request body. It's a JSON object with placeholders like {{p1}} which are expected to be replaced with actual values during runtime. For example, if {{p1}} is replaced with "value1", the resulting body would be {"param1":"AAA","param2":"value1"}. Can be removed as well if no parameters are being used.
jsonpath_for_data: Specifies the JSON path used to extract data from the response of the API. This JSON path should be formatted according to the JSONPath specification and will be used to extract specific data from the response payload, usually it is “$.response_data.data”.
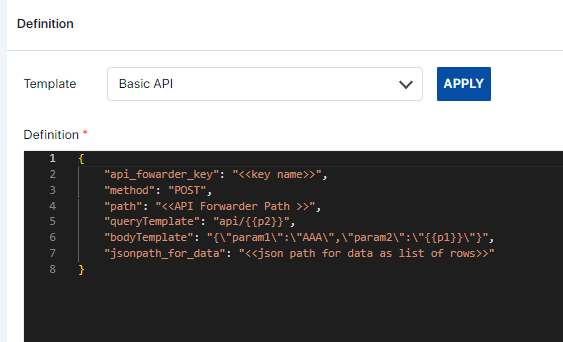
Basic API: These are often configured by Assette. If any private API endpoints are available that can be utilized, it should be configured within Assette and the endpoint should be whitelisted for the Assette Application to use. A description of the parameters is as follows.
api_fowarder_key: The key name created by Assette for certain use cases.
method: We are using the "POST" method to send data to the API. Other common HTTPS methods can be used.
path: The path key is configured by Assette based on the API configuration. (optional).
queryTemplate: The API expects the parameter name to be passed as part of the path. (optional).
bodyTemplate: This represents a template for the request body. It's a JSON object with placeholders like {{p1}} which are expected to be replaced with actual values during runtime. For example, if {{p1}} is replaced with "value1", the resulting body would be {"param1":"AAA","param2":"value1"}.
jsonpath_for_data: We're specifying the JSON path to extract the current weather data from the API response. In this example, we're assuming the relevant data is located under “$.response_data.data”.
Return Columns Separately: This is a slight alteration to the Basic API type, with an extra parameter to output the column names.
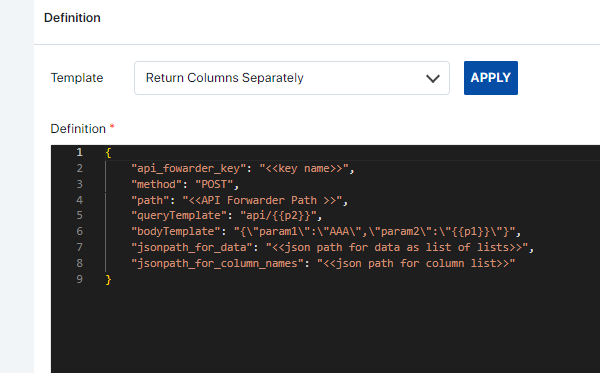
A description of the parameters is as follows.
api_fowarder_key: The key name created by Assette for certain use cases.
method: We are using the "POST" method to send data to the API. Other common HTTPS methods can be used.
path: The path key is configured by Assette. (optional)
queryTemplate: The API expects the parameter name to be passed as part of the path. (optional)
bodyTemplate: This represents a template for the request body. It's a JSON object with placeholders like {{p1}} which are expected to be replaced with actual values during runtime. For example, if {{p1}} is replaced with "value1", the resulting body would be {"param1":"AAA","param2":"value1"}.
jsonpath_for_data: We're specifying the JSON path to extract the current weather data from the API response. In this example, we're assuming the relevant data is located under $.response_data.data.
jsonpath_for_column_names: This likely represents the JSON path used to extract column names or headers from the response data. It is expected to return a list of column names. Usually, the parameter can be filled as “$.response_data.columns”. (optional)


Based on the requirements, any of the above templates can be used to extract data.
Example 1: (API Configuration within Assette):
A sample data block named “DEMO_API_HoldingsDetails”, is created to demonstrate the process.
1. In the General Info tab define the Data Block settings and pick “API Call” as the Block Type.

2. Select a suitable template as per the requirements. For this example, the Basic API type template was selected, and the parameters were changed as required.
{"api_fowarder_key": "Dynamicapi",
"path": "/api/holdings/portfolioholdings",
"method": "POST" ,
"bodyTemplate":
"{\"AccountCode\":\"{{AccountCode}}\",\"AsofDate\":\"{{AsofDate}}\",\"CurrencyCode\":\"{{CurrencyCode}}\",\"SectorScheme\":\"{{SectorScheme}}\"}",
"jsonpath_for_data": "$"} 
3. Save the Data Block and test it with the correct parameters required.

Example 2: (Connecting to a Public Endpoint).
1. Use the Basic HTTPS template and change the parameters as needed. 
2. Once saved, evaluate the block.

2. Snowflake Database Call: Below are the steps to use the Snowflake Database Call Type for data interfacing.
Create a data block with Category as “Interface,” Block Type as “Snowflake Database Call” and the Output Type as provided from the source. For this example, the “Data Table” Output Type is selected.
The basic templates can be opened to see the required parameters.
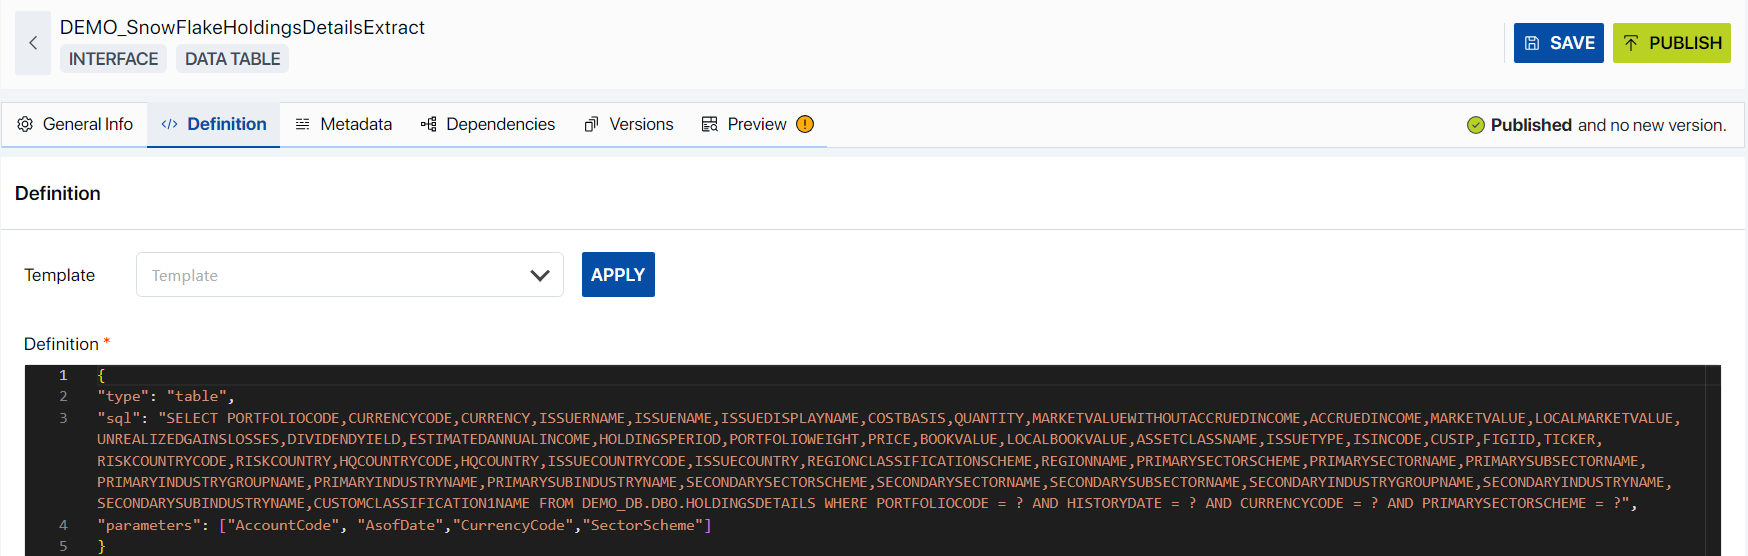
As per the example above when user selects the Basic Template for the the Data Block the structure may appear as follows,
type: This process is designed to mirror the type of the Data Block. For instance, in our ideal scenario, we initiated the process by crafting a Data Table, which we subsequently chose as our Output Type.
sql: This is a SQL (Structured Query Language) SELECT statement, which is used to retrieve data from the database. In this case, it’s followed by a list of column names in the HOLDINGSDETAILS table.
FROM DEMO_DB.DBO.HOLDINGSDETAILS: This specifies the database (DEMO_DB) and the table (HOLDINGSDETAILS) from which to retrieve the data1.
WHERE: This keyword is used to filter the records that the query will return1. In this case, it’s followed by several conditions that the records must meet:
PORTFOLIOCODE =?: The PORTFOLIOCODE of the record must match a specific value.
HISTORYDATE = ?: The HISTORYDATE of the record must match a specific value.
CURRENCYCODE = ?: The CURRENCYCODE of the record must match a specific value.
PRIMARYSECTORSCHEME = ?: The PRIMARYSECTORSCHEME of the record must match a specific value.
The “?” in these conditions is a placeholder for a value that will be supplied when the query is executed.
parameters: The parameters specified herein are utilized within the scope of a database query or function invocation. In the provided example, these parameters serve to supply distinct values during the execution of a SQL query.
AccountCode: This is a unique identifier for an account in a database.
AsofDate: This represents the specific as of date and is used to indicate the date as of which a certain condition is checked or a calculation is performed.
CurrencyCode: This is the code that represents a specific currency, such as USD for United States Dollar or EUR for Euro.
SectorScheme: This would represent the classification scheme for sectors in a certain context.
These parameters would be used to provide specific values when executing a SQL query. The actual values would be provided at the time of execution. For example, in the SQL query you provided earlier, these parameters could be used to replace the “?” placeholders in the WHERE clause. The AccountCode parameter would replace the first “?”, AsofDate would replace the second “?”, and so on. This allows the query to be customized for different situations without changing the overall structure of the query.
Once saved, user can simply test and evaluate the Data Block by providing the necessary parameters.


3. Local Database: Below are the steps to use the Local Database Block Type for data interfacing.
Create a data block with Category as “Interface”, Block Type as “Local Database” and the Output Type as provided from the source. For this example, the “Data Table” Output Type is selected.

ii. The basic templates can be opened to see the required parameters.

iii. As per the example above when user selects the Basic Template for the Data Block the structure may appear as follows,
type: This process is designed to mirror the type of the Data Block. For instance, in our ideal scenario, we initiated the process by crafting a Data Table, which we subsequently chose as our Output Type.
sql: This is a SQL (Structured Query Language) SELECT statement, which is used to retrieve data from used to retrieve data from the ProductMaster table in the local database. Below is the breakdown of the different parts of the query of the provided example.
SELECT DISTINCT: This part of the query is used to return only distinct (unique) rows in the result set. In other words, it eliminates duplicate rows from the results.
ProductID, Code, StrategyID, SubStrategyID, VehicleID, CompositeID, RepAccountID, IsActive, Type, ParentId: These are the columns that the query will return data from. Each of these is a column name in the ProductMaster table.
FROM ProductMaster: This specifies the table that the query will retrieve data from, which in this case is the ProductMaster table.
WHERE IsActive=1 AND Code is not null: This is the condition that the rows must meet in order to be included in the result set. In this case, the query will only return rows where the IsActive column is equal to 1 (which usually indicates that the product is active), and the Code column is not null.
parameters: In the given example it is indicated that this query does not have any parameters. Parameters are values that are added to a SQL query at runtime, and they can be used to modify the behavior of the query. Since this array is empty, it means that the query does not use any parameters in the given example.
iv. Once saved, the user can simply test and evaluate the Data Block.

4. Constant: Below are the steps to use the Constant Block Type for data interfacing.
i. Create a data block with Category as “Interface”, Block Type as “Constant” and the Output Type as provided from the source. For this example, the “Values” Output Type is selected.

ii. The basic templates can be opened to see the required parameters.

iii. As per the example above, when user selects the Basic Template for the Data Block the structure may appear as follows, this is a JSON object that maps date format strings to their corresponding strftime directives.
"yyyy-mm-dd": "%Y-%m-%d": This represents a date format where the year is first, followed by the month, and then the day. Each is separated by a hyphen. For example, 2024-12-31.
"yyyy/mm/dd": "%Y/%m/%d": This is similar to the previous format, but the year, month, and day are separated by a slash. For example, 2024/12/31.
"mm/dd/yyyy": "%m/%d/%Y": This represents a date format where the month is first, followed by the day, and then the year. Each is separated by a slash. For example, 12/31/2024.
"mm/dd/yy": "%m/%d/%y": This is similar to the previous format, but the year is represented by the last two digits. For example, 12/31/24.
"yyyy-longmonth-dd": "%Y-%B-%d": This represents a date format where the year is first, followed by the full month name, and then the day. Each is separated by a hyphen. For example, 2024-December-31.
"yyyy-shortmonth-dd": "%Y-%b-%d": This is similar to the previous format, but the month is represented by its abbreviated name. For example, 2024-Dec-31.
"dd/mm/yy": "%d/%m/%y": This represents a date format where the day is first, followed by the month, and then the last two digits of the year. Each is separated by a slash. For example, 31/12/24.
iv. Once saved, the user can simply test and evaluate the Data Block.

Client Python Library Calls
The Client Python Library blocks serve as reusable Python modules that encapsulate functions and classes. When incorporated into other Python code as a dependency block, these modules allow seamless access to their defined functionality, promoting code organization and maintainability.
Sample CustomLib Block
Let’s consider a specific example named CustomLib. This block contains the following functions:
Let us define 2 functions.
helper(x: float, y: dict)
helper2(x: float, y: dict)
You can think of these functions as any other typical python function you develop. You can send parameters and data structures which can then be transformed and used to return the required output. We encourage the developers to use these library blocks if they encounter functions which they have to repetitively use on certain data sets.
How to Use CustomLib
To utilize the functions and classes inside the CustomLib block, follow these steps:
Add CustomLib as a Dependency:
In your Python code, include CustomLib as a dependency block.
This ensures that the functions within CustomLib are accessible.
Refer to the Dependency Block in Transformation:
In your transformation block, reference the dependency block name (CustomLib).
Use the functions from CustomLib as needed.
Python
# Add 'CustomLib' as a dependency
output = CustomLib.helper2Data()
# Assign the output to a response dictionary
response["values"] = output
Python – Call function from another function
For security reasons, Assette Python data blocks are executed in a sandboxed environment. As a result, there are minor differences in how the Python interpreter handles them.
In a typical python implementation, you would be able call a function that you declare in your global scope without having to explicitly declare the function as global, as follows:
Direct Execution (Without Sandbox):
Python
def get_name():
return "John"
def get_message():
return f"Hello {get_name()}"
response["text"] = get_message()
However, within the sandbox you will have to declare the function that you want referenced within another function as global. Therefore, you will need to execute an extra step as follows within your data block,
Python
global get_name
def get_name():
return "John"
def get_message():
return f"Hello {get_name()}"
response["text"] = get_message()
In the sandboxed environment, all top-level functions are considered global. Therefore, we use the “global” keyword to import them into the scope.
Developer Tools User Roles and Permissions
Role based privileges will determine the level of access a user has as defined below.
Role |
#1. Data Block Viewer |
#2. Data Block Developer |
#3. Data Block Admin |
Task | Description | Role# |
Block View | Search Block, View Blocks, View Dependencies, View Dependency Settings | 1,2,3 |
Test Block | Test Block by providing request parameters if specified | 1,2,3 |
Create Block |
| 2,3 |
Publish Block |
| 2,3 |
Edit and Save Block |
| 2,3 |
Copy Block |
| 2,3 |
Export Block |
| 2,3 |
Import Block |
| 2,3 |
Publish Block |
| 2,3 |
Go to Dependency from View Page |
| 2,3 |
Delete Dependency from View Page |
| 3 |
Delete Block |
| 3 |